Side Table Makeover
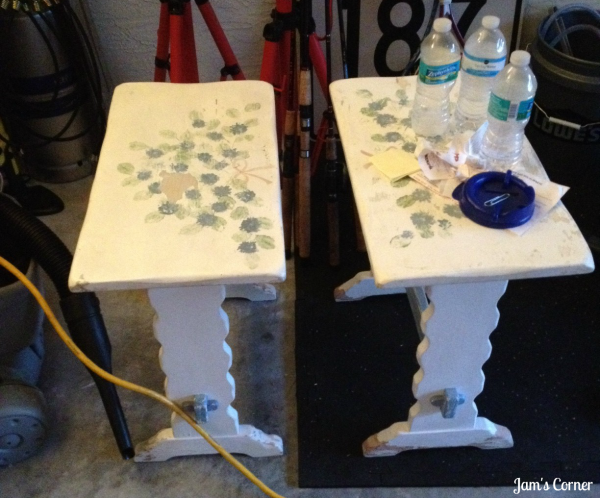
For some time now I have been looking for matching side tables for our master bedroom. I had looked at furniture stores, discount stores, some yard sales and Craigslist but didn’t really find anything that I wanted to spend money on. Then one day I went into a thrift store and found these two little side tables that were in desperate need of a makeover. I paid $15 for both of them.

I initially thought that using paint thinner would do the trick to removing the old paint but I soon found out that that would NOT work. So I went to the store and bought and an electric sander. I have future furniture redo projects on my mind so I feel the money was well spent. Anyways, I took to sanding one table and boy was it messy! I advise you do this outside or with a fan blowing so it will blow the dust AWAY from your garage. About 30 minutes or so after sanding, perhaps maybe even an hour, I had removed the multiple layers of paint this thing had on it (I still have to do the other table.) I then primed the table with Rustoleum painters touch primer.
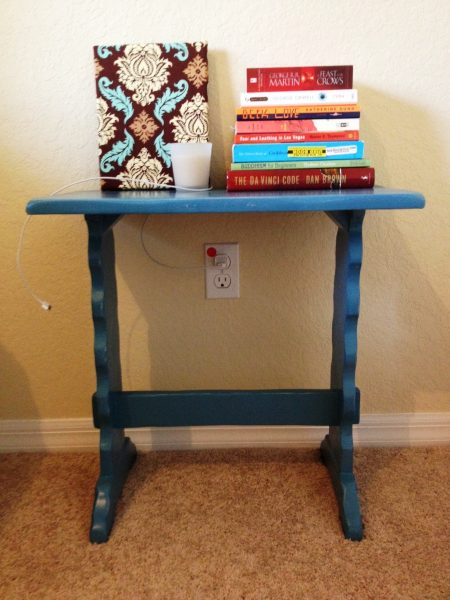
After priming the table, I painted it with spray paint. I was going to use chalk paint but I decided on spray paint mainly because I liked the color for my bedroom (as did my boyfriend – he chose it over Duck Egg, which I would have liked just as well.) I used Krylon Bahama Breeze. After the paint dried, I did a little distressing and then I went over the table with a satin clear coat finish. Here is the finished table. I still have to sand and paint the other table. I will be doing that this weekend.


Great job! :) I like the color too!
Happy Day!
Michelle
http://www.daydreambelievers.net
Thank you, Michelle!
Awesome…I'm currently crushing on turquoise so I'm loving this transformation!
Thank you, Marilyn! :)
This looks great, I love the color. Good choice boyfriend! One of the best investments I ever made was my electric sander. It makes things so much simplier!
Wow, Julie that looks really good. You are really coming along with your furniture re-do's. I really need to try thrifting, but I get so discouraged cause I never find anything! :)
Great tables for a great price. I love the color and it looks great! Thanks for sharing at the All Star Block Party.
Holly
Thank you, Morgan!
Thank you, Jess! You just have to use your imagination when you see things. It may be ugly at first sight but imagine the things you could do with it. :)
Looks great! :) Love the color!
Thank you, Holly. :)
Thanks! :)
Nice makeover! Love the color!
Well, aren't they just darling! Wonderful job making them pretty. Visiting from Southern Lovely. Would love it if you would share this at my Make it Pretty Monday at The Dedicated House. http://thededicatedhouse.blogspot.com/2012/07/make-it-pretty-monday-week-4.html Wishing you a grand day! Toodles, Kathryn @TheDedicatedHouse
Julie, thank you for sharing this at the Make it Pretty Monday party at The Dedicated House. I hope to see you again next week. Toodles, Kathryn @TheDedicatedHouse
Julie Ann, What a bright and cheery color! Fabulous painting tutorial… with great results! And just think, you didn't spend a lot of money! Just goes to show… creativity and a little work = fabulous results!
Your project would be perfect to share at TUTORIALS TIPS AND TIDBITS, my new weekly linky party going on now! Come on over and join in!
Super cute! I absolutely LOVE the color.
You're welcome, Kathryn!
Thank you, Sonya. :)
Great job, and great color choice! Would love for you to come link up at mercyinkblog.com for our Heart&Home link up! :)
xo,
lauren
Much better…what a difference! I love the color choice. Boy were they ugly before! Great job; glad you shared at Shine on Fridays!
Very cute redos and great deals, too!
Thanks for linking up this week!
Stacey of Embracing Change
I love the after. The color is gorgeous! Thanks for sharing on Tout It Tuesday. Hope to see you again for tomorrow's party.